How do I set up an email filter for my domain?
The following article explains how to set up email filters that extend to all mail accounts in your domain. These filters, known as Domain Content Filters in SmarterMail, are used to perform specific actions on emails that meet certain criteria. Filtering is most commonly used to remove emails that are considered Spam, but they can also be used to process legitimate emails. Domain Content Filters are applied to emails received by all mail accounts in your domain. Users of these mail accounts are not aware of these filters, nor do they have the ability to change or turn off the filters.
Note: If you wish to create a content filter for a single email account, instructions can be found here.
To create a Domain Content Filter, please follow these steps:
- Open a browser window and go to one of the following URLs:
- http://mail.yourdomainname.com
- http://mail#.safesecureweb.com (this address is provided in the setup email)
- Login as root@yourdomainname.com with the password supplied in your setup email.
- From the Settings menu select Domain Content Filtering.
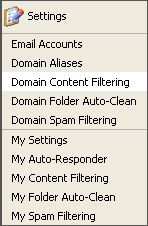
- Click Add Filter.

- Select the Filter Criteria:
- From Address: applies the filter to messages from specified addresses and/or domains
- Contains specific Words or Phrases: applies the filter to specified words within specific areas of incoming messages
- To Address: applies the filter to messages sent to specified addresses and/or domains
- Attachments: applies the filter to attachments that meet or exceed a specified size and that come from or are sent to specified addresses and/or domains
- Other: applies the filter to other specified criteria for messages that come from or are sent to specified addresses and/or domains
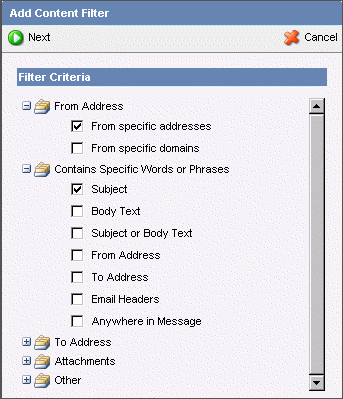
- Click Next.
- Based on the Filter Criteria, enter the necessary details to build the filter:
- Filter Type: specify whether all criteria must be met or only one criteria must be met to apply the filter
- Criteria Details: specify the address(es) and subjects that will be filtered
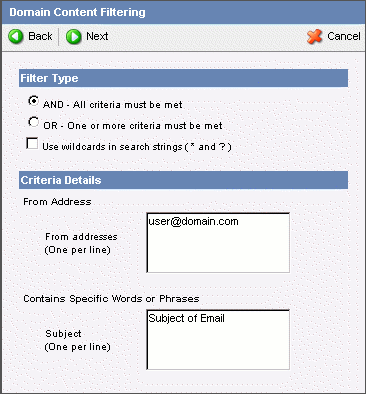
- Click Next.
- Create a name and assign rules for the new filter by entering the following details:
- Rule: select a name for the new filter and verify the shown criteria
- Actions: select the routing action for the message and set any comments or headers
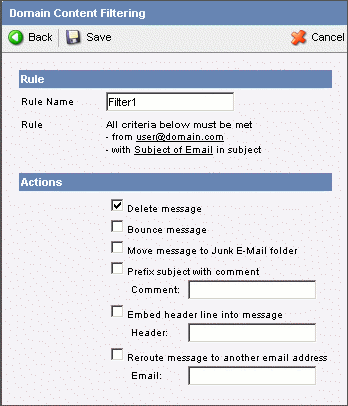
- Click Save.
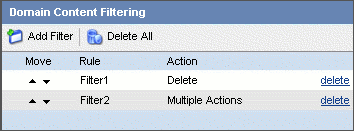
The filters are processed in the order shown. You can rearrange the order by clicking the "Up" or "Down" arrows next to a rule name. Once a message goes through a filter, it is processed and may not be affected by additional filters.
Note: For detailed information about each filter option, view the SmarterMail support documentation by clicking on the 'Help' menu in the upper right corner of the SmarterMail interface.

 Order
Order